
Website Speed Optimization
3 Steps to 3 Seconds .. or lessWebsite Speed Optimization: 3 Steps to 3 Seconds

3 Steps to 3 Seconds or less page load speeds.
How to optimize your website speed.
Step 1: Optimize your server for speed
Some of these items will depend on your particular hosting account type and configuration.
Check with your web host to see what's available and the process to get them installed/configured for your account.
- Type of hosting accounts and how they affect optimization.
- Simple shared hosting will be limited in what can be optimized since you're sharing the server with others.
- VPS (Virtual Private Server) will allow you to fully optimize your server. Always get "root" access if at all possible.
- Dedicated server will allow you to fully optimize your server environment.
- Cloud hosting will vary by vendor so you'll need to check with them as to what optimizations are available.
- These optimizations are available for some shared and all VPS and dedicated servers.
- Operating system - Linux (recommended)
- Database - MariaDB (recommended)
- Web server - Apache or Nginx (recommended for high volume servers)
- Server disk caching (ask your web host to install/configure)
- Zend OPcache
- Memcache(d)
- CMS - WordPress latest version (recommended)
- Theme - Premium theme to insure support/updates.
- Plugins - Less is more, so try to limit plugins to only those that are a "must have".
- Performance Plugins: I have used the following, all with varying degrees of success:
- Autoptimise
- Async Javascript
- Cache Enabler
- Hummingbird Page Speed Optimization
- Perfmatters
- WP Fastest Cache
- WP Rocket
- WP SuperCache
- W3 TotalCache
Currently, I have settled on the Perfmatters plugin for all my sites. This is a lightweight premium plugin but you pay once and you can use it on UNLIMITED websites! It's super simple to use and just works. Every site is unique so you will need to test to find the optimal combination.
- Performance Plugins: I have used the following, all with varying degrees of success:
- Enable gzip compression
- Make sure the mod_deflate module for Apache is installed (check with your web host)
- Enable via Apache Virtual Host Configuration (recommended) or .htaccess
A good web host will install and configure the above for you if necessary - Check to make sure compression is working: checkgzipcompression.com
- Enable expires headers for Apache
- Make sure the mod_expires and mod_headers modules for Apache are installed (check with your web host)
- Enable expires and header cache control via Apache Virtual Host Configuration (recommended) or .htaccessI Here's a good article from LiquidWeb on configuring both: How to Configure Apache 2 to Control Browser Caching
Step 2: Compress images
TIP: Always size images to their correct display dimensions BEFORE compressing. This allows the image to be used at its full dimensions and prevents the image from being resized on the fly by WordPress, which adds to the page load time. If you're unsure of the best display dimensions, you can use the Nimbus Chrome extension to quickly get an approximate dimension of the display space.
"Simply compressing images and text can be a game changer—25% of pages could save more than 250KB and 10% can save more than 1MB that way." Source
Free resources to compress images:
Imagify Image Optimizer - Manual compression of jpg, png, and gif. Maximum file size 2 MB.
Imagify Image Optimizer WordPress plugin - Automatic bulk compression of jpg, png, and gif. Free 25MB of images (about 250 images) every month.
Shortpixel - Manual compression of png, jpg & gif images. Maximum of 50 images at a time at a maximum of 10MB each.
Shortpixel WordPress plugin - Automatic compression of png, jpg & gif images plus pdf files. Up to 100 free images per month.
Smush WordPress plugin - Automatic compression of png & jpg images. Maximum 1MB file size.
Smush.it - Online manual compression of png & jpg images.
TinyPNG - Manual compression of png, jpg. Maximum of 20 images at a time at a maximum of 5MB each.
TinyPNG WordPress plugin - Automatic compression of png & jpg images. Approximately 100 images each month for free.
You can test the above to see which suits your needs best. Even though I've installed the TinyPNG WordPress plugin on most sites, I have gotten in the habit of manually compressing images before uploading them to the server. In most cases, this only takes a few minutes and keeps monthly compression below the limits of the free WordPress plugin.
Step 3: Caching
[bctt tweet="The single best thing you can do to improve your website speed is to implement what is called caching." username="BrianAlaway"]
"In computing, a cache /?kæ?/ KASH,[1] is a hardware or software component that stores data so future requests for that data can be served faster". via Wikipedia
Onsite caching for Website Speed Optimization
In short, caching is a method of storing elements of your website, e.g. a page, an image, javascript code, etc. so that it can subsequently be displayed faster. This process of caching can take place at various points along the path from when a user browses to a website until that website is displayed.
- browser cache
The browser itself can be instructed to "cache" website elements, this is known as the browser cache and anyone who has spent any time browsing the web has probably been instructed at some point in time to clear their browser cache.
- server cache
Another place where this caching can take place is on the web server itself. Special software on the server can be set to cache commonly accessed elements of the site. This is known as on-server caching, or server disk caching. In the case of WordPress websites, constructing a webpage may require multiple calls to the database to fetch stored elements. The more calls, the longer it takes to build and display the webpage. Pages or elements of pages stored in the "cache" eliminate the need to call the database thus speeding up this process.
Here's how to run WHM NGINX Manager alongside the Apache webserver. This will allow you to use the NGINX Reverse Proxy caching.
https://docs.cpanel.net/whm/software/nginx-manager/
- proxy server cache
Another place where this caching can take place is on a dedicated caching server or servers. In the web environment, this server sits between the end user's browser and the web server, acting as a proxy that receives the request from the browser, and checks to see if the web page requested is already stored in the cache and if it is, displays it to the browser. If it is not, the proxy server passes the request on to the web server.
Offsite Caching for Website Speed Optimization
- Content Delivery Network (CDN)
Now if it were only a single server, it would have limited advantages or just displaying a website directly from the web server. But now consider that instead of just one proxy server in one location, your web page could be stored on multiple proxy servers, located strategically around the entire world. So someone, sitting in Oregon, browses your website located on a server in New York but instead of waiting for that page to be retrieved from the East Coast, the page is served from a proxy server on the West Coast, greatly improving the time it takes for your website to be displayed. Multiple proxy servers, distributed geographically are called a CDN (content delivery network).
Cloudflare is a global CDN network that provides enhanced performance and security. It operates using what is called a "freemium" model, meaning you can begin using it for free and as your needs grow, you can purchase different premium levels with additional features and benefits. This is great news for many website owners as they may never need the advanced features but can still take advantage of Cloudflares' enhanced performance and security.
Here's how to quickly enable the Cloudflare CDN for your server.
What you will need:
- Access (user name/password) to your DNS Name servers and/or DNS records
This is usually the domain registrar where you purchased your domain name. - First check to see if Cloudflare is installed in your cPanel account. If yes, you can activate your Cloudflare account from within cPanel.
- Alternatively, go to Cloudflare.com and sign up (it's free).
- As part of the account creation, you will be given the names of 2 Cloudflare name servers. You will log in to your domain registrar, go to your DNS management console, look for the current DNS nameservers and replace those with the Cloudflare nameservers. This change usually happens very quickly, within minutes but could take longer.
- Once your site is active on Cloudflare, you can proceed to configure the performance and security options.
Below is an example of settings in the Cloudflare Speed module. This example is for the free Cloudflare account. Some features are only available at the paid account levels.
IMPORTANT: EVERY SERVER/SITE IS UNIQUE, YOU WILL NEED TO TEST THESE SETTINGS ON YOUR SERVER AND ADJUST ACCORDINGLY. THESE SETTINGS ARE EASILY ENABLED/DISABLED BUT YOU SHOULD TEST ON A NON-PRODUCTION SERVER.
Cloudflare Website Speed Optimization

For $5/month you can add Cloudflares' Automatic Platform Optimization for WordPress. This is also included free in Cloudflare Pro.
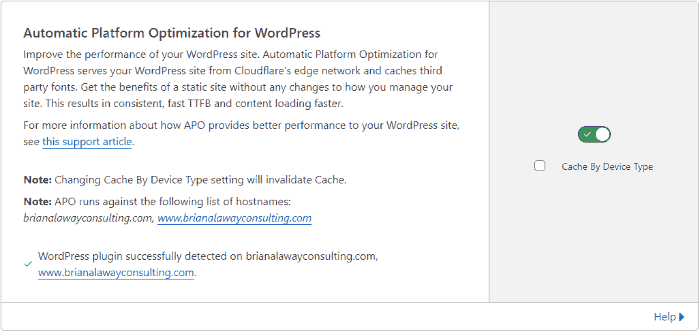
APO can substantially improve your page load speed, especially in the time to first byte (TTFB), which is part of Google's core web vitals page speed scores.
Final thoughts on Website Speed Optimization
Following the less is more mantra in pursuing a clean minimalist web design will go a long way towards optimizing your website for fast page load speeds. Focus on making the website functional and user-friendly and you'll be rewarded by happy visitors, not just search engines.
Hopefully, this gives you a good foundation to build on for your website speed optimization. Fast page load speeds for websites are no longer a "nice to have". Google has considered page speed on desktops a minor ranking factor since 2010 and recently announced that page speed on mobile is now a minor ranking factor for slow sites.
Take the time to optimize your website for speed and you'll not only keep Google happy, but your site visitors will also love your fast-loading pages.
*Google Research, Webpagetest.org, sampled 11M global mWeb domains loaded using a globally representative 4G connection, January 2018.
Managed VPS Hosting


SEMRUSH


 Cloudflare Warp ·
Jump on the Internet fast lane by installing the WARP app. It's free and protects you from malware and Internet spies! #1dot1dot1dot1 1.1.1.1 — The free app that makes your Internet faster and safer.
Cloudflare Warp ·
Jump on the Internet fast lane by installing the WARP app. It's free and protects you from malware and Internet spies! #1dot1dot1dot1 1.1.1.1 — The free app that makes your Internet faster and safer.

